#| label: setup-scrape2
#| message: false
#| warning: false
#| echo: true

library(tidyverse)
library(rvest) 27 Introduction to scraping in R
This chapter introduces the rvest – short for “harvest” - library in R. See the glossary in the Appendix for terms used in this tutorial.
There are a lot of really good tutorials on the web for rvest. Here are a few:
A chapter in the advanced data wrangling textbook used at Stanford. (The whole book is pretty good, and would be good for you now that you’re no longer beginners.) It uses the page from Our World in Data on famines as its example.
A free chapter from DataQuest on the basics of scraping
If there is one reason to sign up for DataCamp it may be for the value of their scraping lessons.
This chapter assumes you are, by now, relatively comfortable with R code chunks. In particular, it’s assumed you know how to assign the output of a piece of code to a new variable, and that you understand the pipe structure with the key verbs of the tidyverse.
27.1 Understanding a web page and its structure
Web pages are written in HTML, even if they don’t have “html” at the end of the file name.
HTML is like an upside-down tree. It has a trunk, which is an <html> tag, then two main branches: <head> and <body>. The content of the page branches out from the body tag:
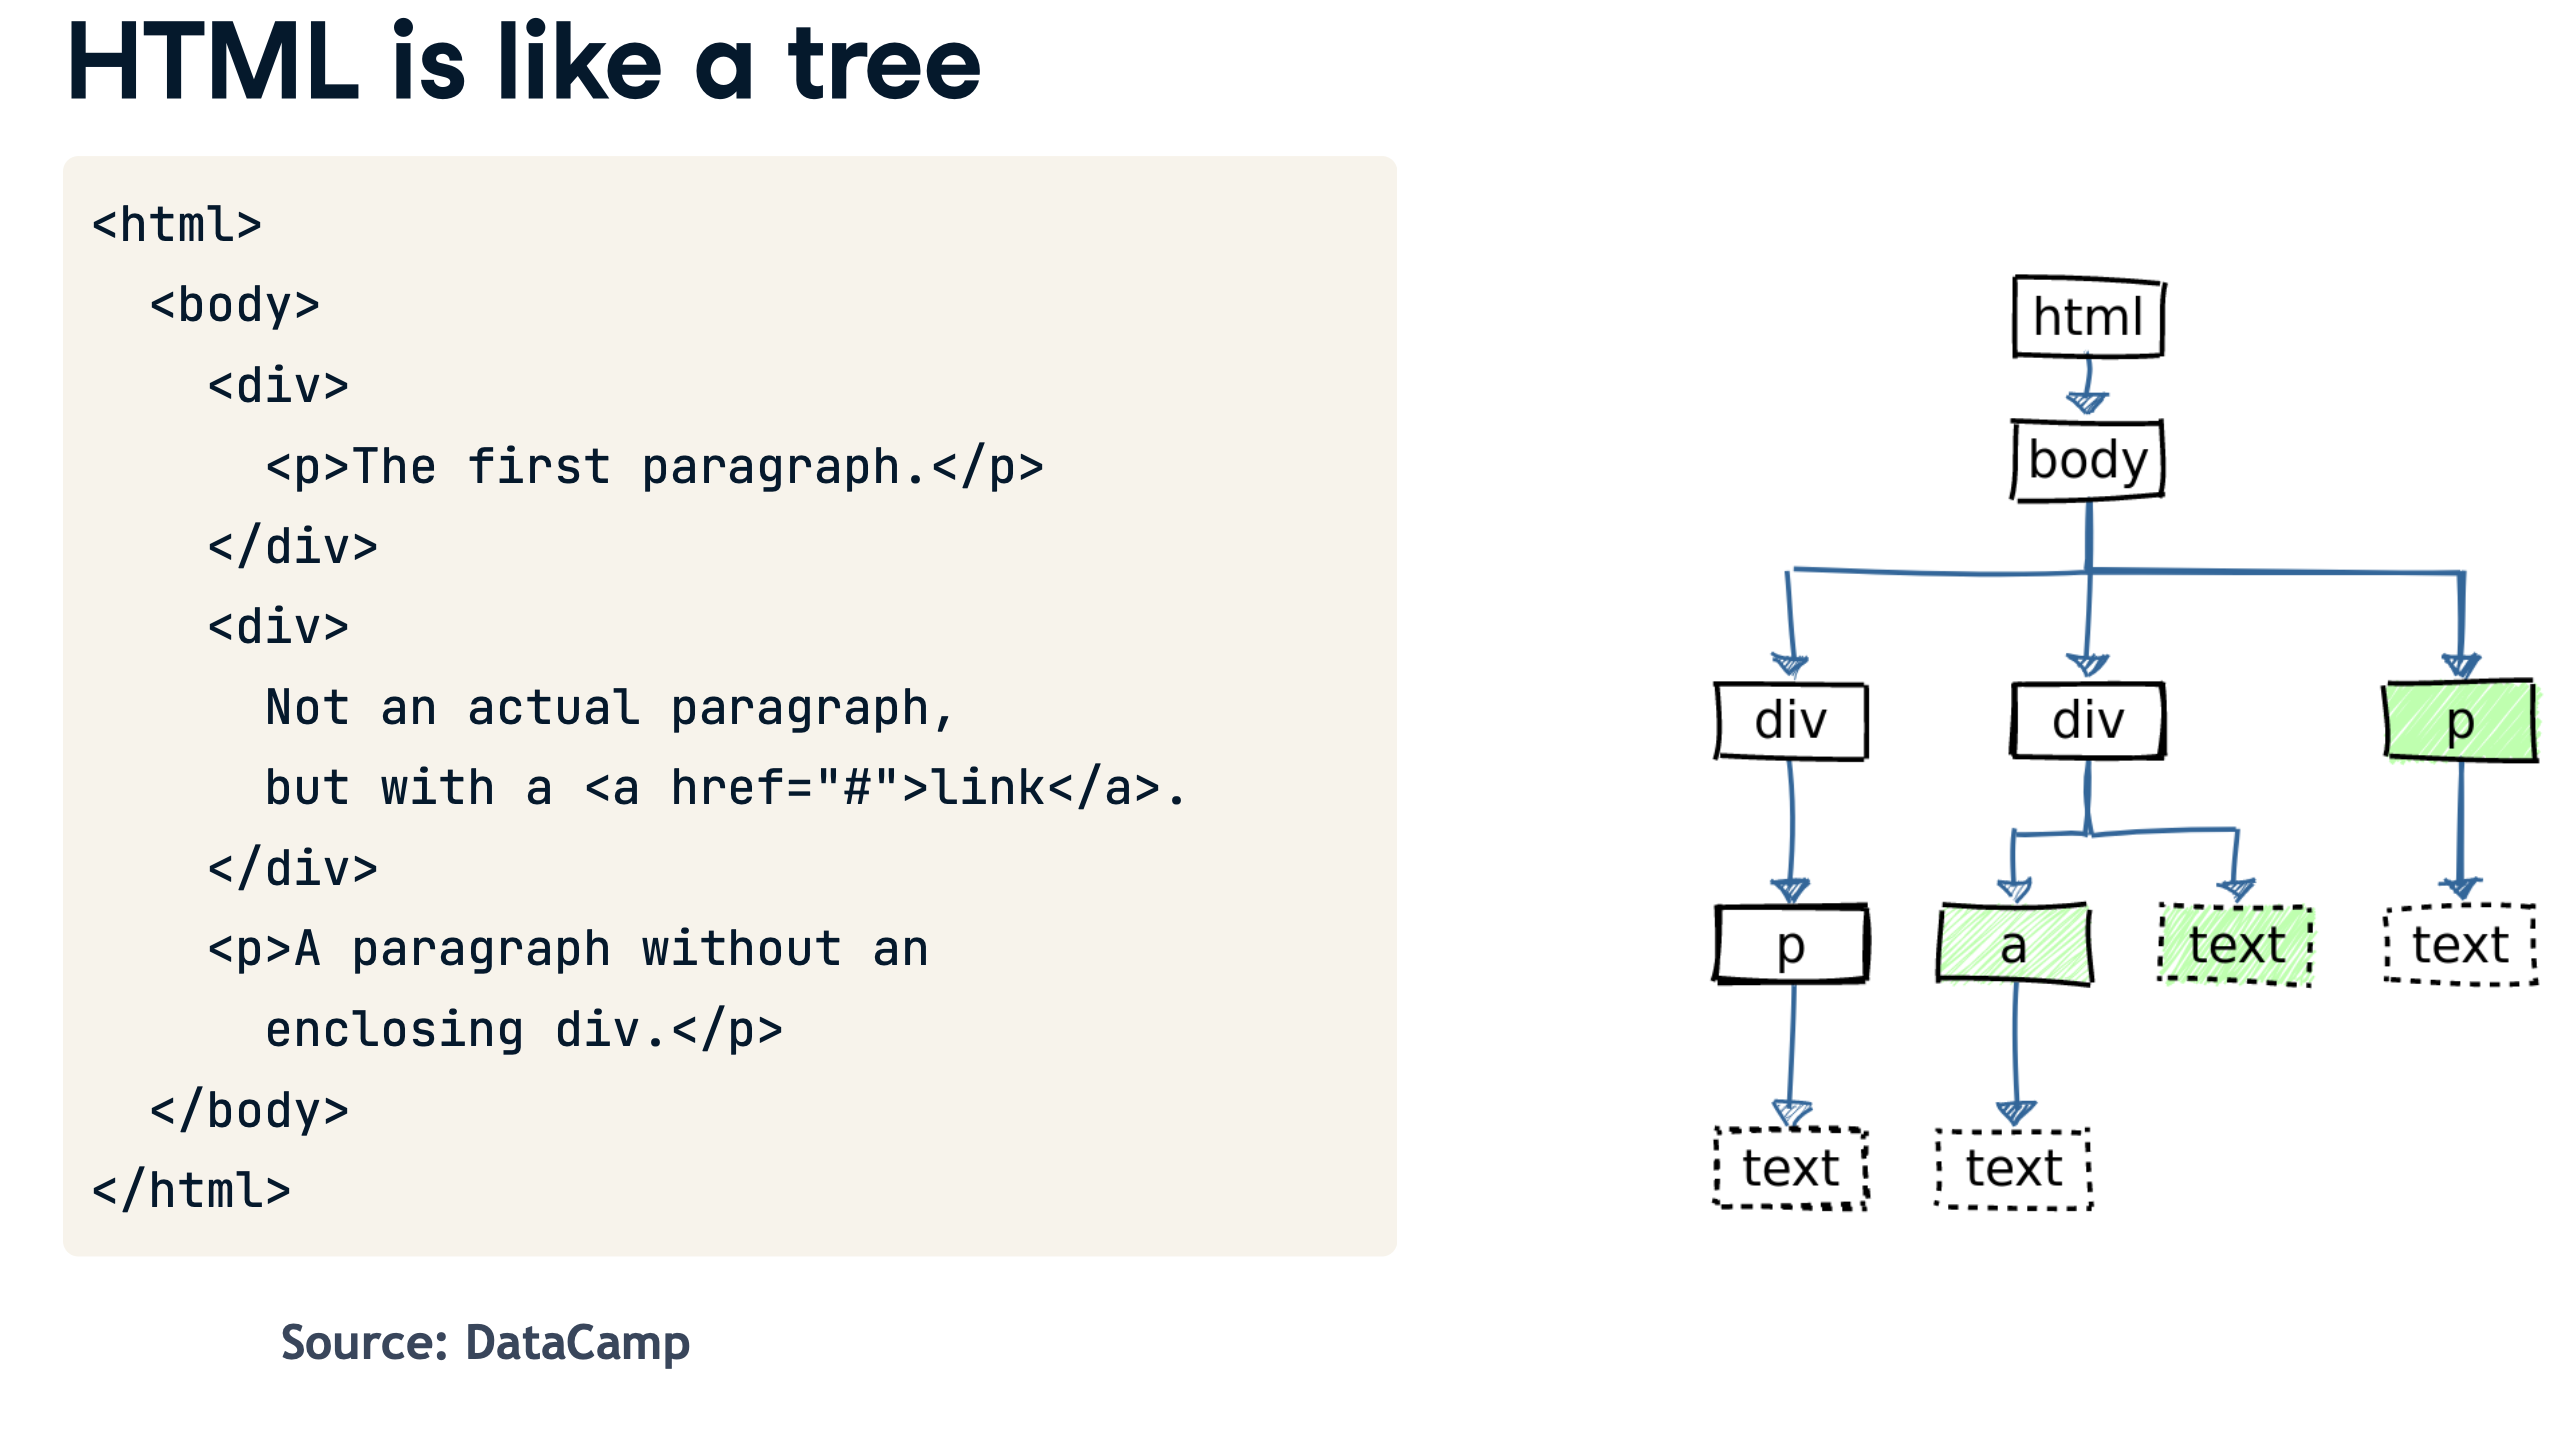
All of HTML is just text. The tags tell your browser how to render each element, while attributes give them extra information, like the URL of a link, or a formatting class.
We can navigate the tree using RVest.
Open or create a project in RStudio, and create a new document. You can do this as a new markdown document, or as an R Script.
The code to load two libraries:
- And run your setup chunk.
The library rvest splits up the tree into its distinct elements, retaining the structure of the tree. The read_html() function takes a chunk of text, a page saved on your computer, or a page on the internet and parses it into its pieces.
We’re going to parse the page using “css selectors”, which tells the program how to navigate the page. The css selector can use the tag , an attribute, or both to find elements on the page. In this case, there is only one table, so we can just find one element using the “table” tag.
This method of scraping doesn’t work if the page was created on the fly by executing a Javascript program on your browser, the way that the simple page in the last chapter did. Those pages usually have a json dataset that you can grab more easily.
Here’s what the page looks like when rendered, with the full tree shown on the right.
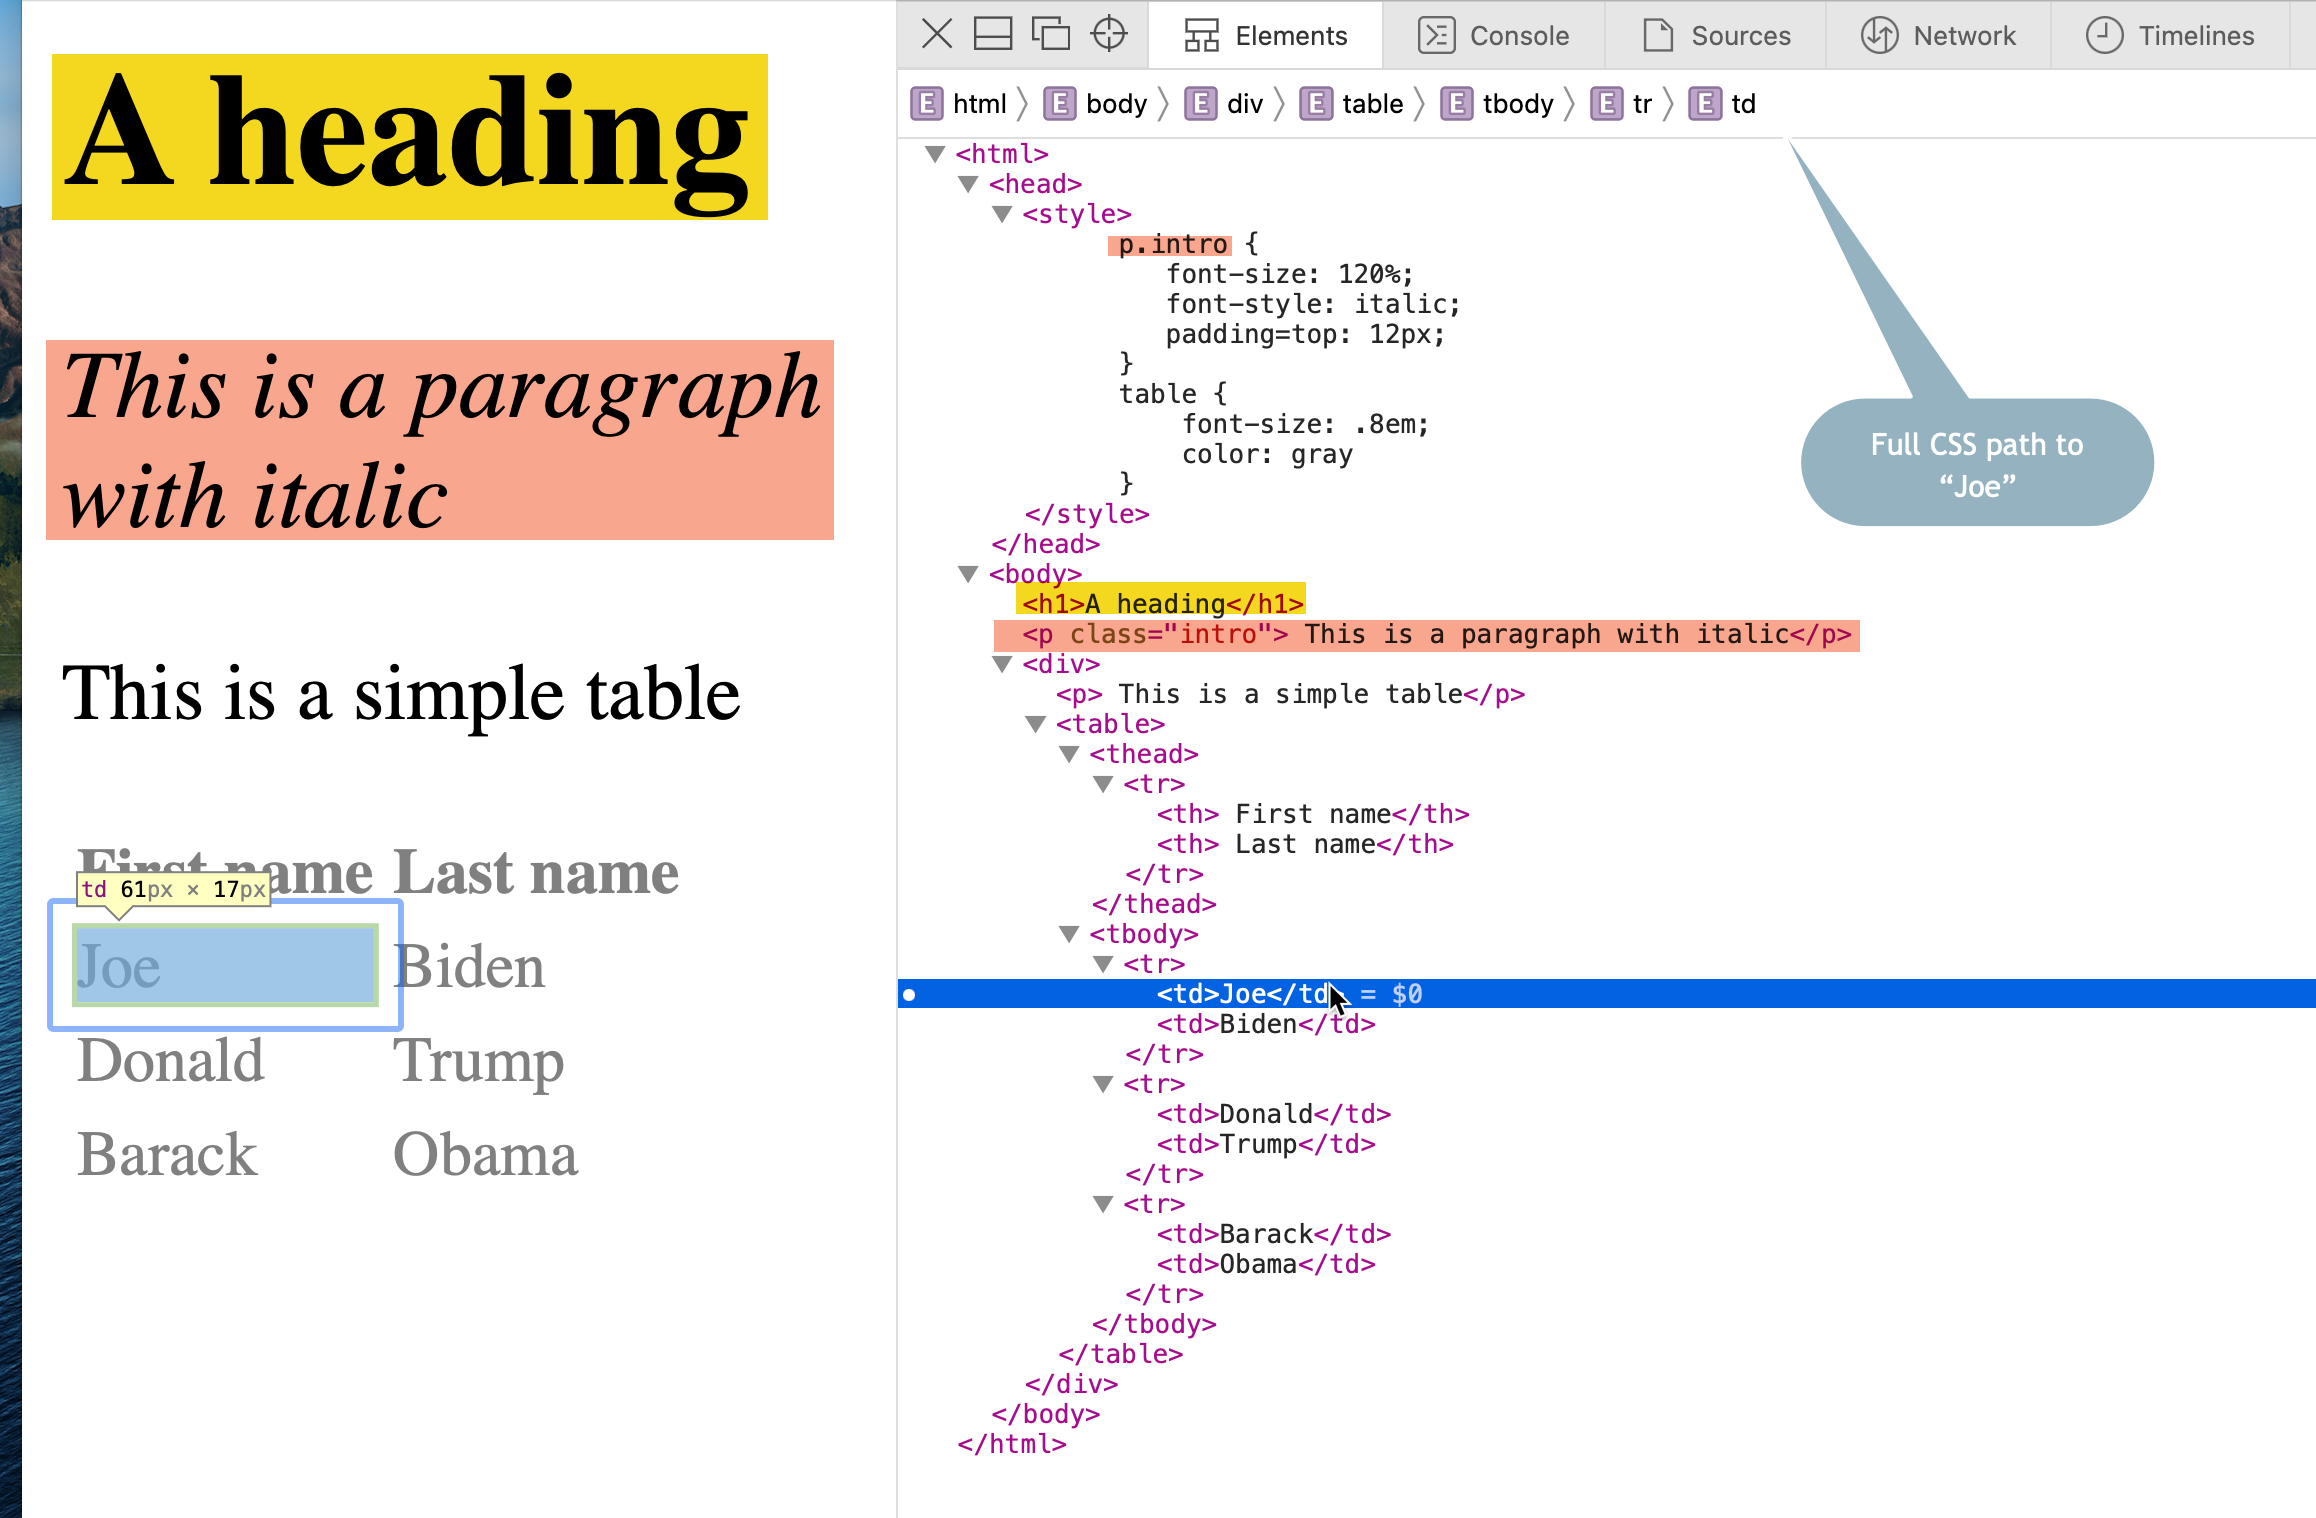
This code parses the simple page at the address shown into its pieces, and save the result as my_htmlYou may notice that I’ve broken up the code to do one thing at a time. First, it saves the address in a variable called “url”. Then it uses the same piping we used in data work.1
# label: readpres
# echo: true
# eval: false

url <- "https://cronkitedata.s3.amazonaws.com/docs/presidents.html"

my_html <-
  url |>
  read_html()


print(my_html)
{html_document}
<html>
[1] <head>\n<meta http-equiv="Content-Type" content="text/html; charset=UTF-8 ...
[2] <body>\n <h1>A heading</h1>\n <p class="intro"> This is a paragraph ...This is a complex object, and you’re only seeing the beginning of it – the two elements that are at the top of the tree. You’ll notice that there is a new object that is a data type called a list rather than a data frame in you environment. Lists are used to store complicated structures that don’t fit neatly into rectangle.
To find any element, like the table, use its tag in an html_node() . To find all of the elements of a type, make it plural, like html_nodes().2
Use the tag name or CSS selector to get just a piece of the page.
my_html |>
 html_element("body")
{html_node}
<body>
[1] <h1>A heading</h1>
[2] <p class="intro"> This is a paragraph with italic</p>
[3] <div>\n <p> This is a simple table</p>\n <table>\n<thead><tr>\n<t ...To get all of the paragraphs, make the command plural. Note how you now get the HTML of the selected elements in their entirety.
my_html |>
  html_elements ("p")
{xml_nodeset (2)}
[1] <p class="intro"> This is a paragraph with italic</p>
[2] <p> This is a simple table</p>And to get everything with a class of “intro”, use a period to indicate a class, and convert it to text using the html_text function, asking R to remove extra whitespace with the “trim” argument.
my_html |>
  html_elements (".intro") |>
  html_text (trim=T)
[1] "This is a paragraph with italic"A special type: table
Tables are so commonly scraped that rvest has special way to extract the values, just as we did in Google Sheets, which puts it right into a data frame:
my_html |>
  html_element ("table")  |>
  html_table ()
The singular version of html_element() picks out the first piece that matches the selector. The plural version would result in a list of all of them, from which you can select the number you want using the odd syntax .[[n]], where “n” is the table number.
A harder example: Ballotpedia
Here’s an example using the ballotpedia page we used in the last section:
url <-"https://ballotpedia.org/List_of_current_city_council_officials_of_the_top_100_cities_in_the_United_States"

ballotpedia <-
  url |>
  read_html() |>
  html_elements("table")

print (ballotpedia)
{xml_nodeset (12)}
[1] <table class="infobox" style="text-align: center; width:200px"><tbody>\n ...
[2] <table class="bptable sortable collapsible collapsed" style="background: ...
[3] <table class="bptable gray sortable" id="officeholder-table" style="widt ...
[4] <table class="wikitable;" style="width=100%"><tbody>\n<tr>\n<th colspan= ...
[5] <table class="navbox" cellspacing="0" style=";"><tbody><tr><td style="pa ...
[6] <table cellspacing="0" class="nowraplinks collapsible autocollapse" styl ...
[7] <table class="navbox" cellspacing="0" style=";"><tbody><tr><td style="pa ...
[8] <table cellspacing="0" class="nowraplinks collapsible autocollapse" styl ...
[9] <table class="navbox" cellspacing="0" style=";"><tbody><tr><td style="pa ...
[10] <table cellspacing="0" class="nowraplinks collapsible autocollapse" styl ...
[11] <table class="navbox" cellspacing="0" style=";"><tbody><tr><td style="pa ...
[12] <table cellspacing="0" class="nowraplinks collapsible autocollapse" styl ...Looking at this, we have several ways to get at the proper table. We can pick the third element that we just got:
ballotpedia[[3]]{html_node}
<table class="bptable gray sortable" id="officeholder-table" style="width:auto; border-bottom:1px solid #bcbcbc;">
[1] <thead><tr colspan="5" style="background:#4c4c4c!important;color:#fff!imp ...
[2] <tbody>\n<tr>\n<td style="padding-left:10px;"><a href="https://ballotpedi ...or, you might notice that it has an “id” attribute called ‘officeholder-table’.
office_holders <-
url |>
read_html() |>
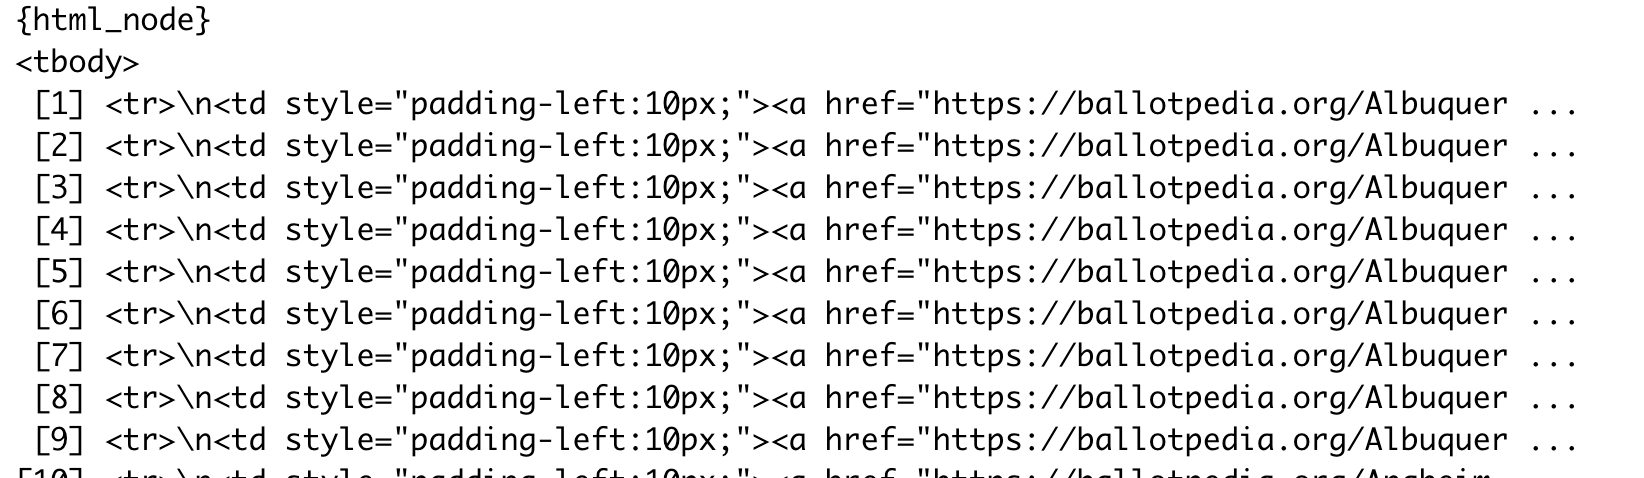
html_node("#officeholder-table > tbody")If you print it, you’ll see something like this:
Getting the link
Before, in Google Sheets, we had no way to pick up the list of links that would tell us what city each member was in. That’s also true when we use the html_table() function to turn it into a data frame:
office_table <-
  url |>
  read_html() |>
  html_node("#officeholder-table") |>  # keep the whole table to get headings
  html_table()
But now we can get a list of the names of cities by extracting an “attribute” from the tag. (This is a little harder than I’d intended because not every row has a link, meaning we have to rejigger the formula to create empty rows when the link doesn’t exist.)
city_links <-
  ballotpedia[[3]] |>  # the third table in our list
  html_nodes ("tbody > tr") |>  # all rows
  html_node ("td > a") |>  # justlink tag in the first column
  html_attr("href")  # the URL


tail(city_links)
[1] "https://ballotpedia.org/Barbara_Hanes_Burke"
[2] "https://ballotpedia.org/Jeff_MacIntosh"
[3] "https://ballotpedia.org/John_Larson_(North_Carolina)"
[4] "https://ballotpedia.org/James_Taylor,_Jr."
[5] "https://ballotpedia.org/Kevin_Mundy"
[6] "https://ballotpedia.org/Robert_C._Clark" We’ve never done this before, but we can add this list as a column to the data frame using the tidyverse add_column() function of the tidyverse . At the same time, you can put your regular expression muscles to work by “extracting” rather than “detecting” a pattern3:
office_table |>
  add_column (city=city_links, .before="Office") |>
  mutate (city_extracted = str_extract(city, "ballotpedia.org\\/(.*)$", group=1) , .after="city") |>
  sample_n(20)
(The str_extract () function matches everything after the last slash , because we put parentheses around the last part, which is a a capture group. This capability used to be very difficut in R – now it’s a bit easier. )
It doesn’t work perfectly, but it generally gets us a bit closer to a city name.
27.2 Your turn
A lot of people use IMDB pages as practice for scraping because its HTML is a little primitive. Try extracting the name, year, rating, and rank of each item in this list https://www.imdb.com/chart/toptv/?ref_=nv_tvv_250
Hints:
If you right-click on the table, you’ll see the table has an attribute of
class="chart full-width". That means you can use the class selector.chart > table. If you use plural, it will be a list with one item in it. If you use singular, it will be the table itself.To get three columns in a data frame of text,
html_table(trim=T)The year is held in a span element with a class of “secondaryInfo” in the first column. See if you can figure out how to get at it. 4
To extract title and its link, use the
atagTo get the full information from the rating column, including the number of votes that it’s based on, use the
strongtag then thetitleattribute. See if you can figure that one out.To put them all together, use the add_column() verb
27.3 Cheat sheet
Rvest functions
| function | description |
|---|---|
read_html() |
to parse the page. Start with a file name or URL. |
html_elements |
to get ALL elements that match your query. It always gives back a list of objects, even if it’s empty. To pluck one by number, use [[n]]. You might see it as html_nodes(), which is from an older version of the rvest library |
html_element |
the FIRST element that matches your query. Always returns a single object. (You might see html_node()) |
html_table() |
convert a table to a data frame with just its text |
html_text(trim=T) |
get the text within an element. |
html_attr (attr_name) |
get the value of an attribute. Commonly, this is used as httr_attr("href") to get the link inside an a link element. |
add_column |
append columns to the end of a dataframe from lists/vectors. They must be in the same order, and there have to be the same number of items as there are rows. |
add_row |
to append rows at the bottom. These can be by name or position. There can’t be any columns in the row you want to add that aren’t in the one you’re adding to. |
(You’ll often see these operations as cbind and rbind - they’re similar. Our way is just the tidyverse way.)
Examples of common CSS selectors
This uses an example assuming the tag “p” , class “myclass” and id “myid” are used. You substitute the tags, classes, and id’s you want. See https://www.scraperapi.com/blog/css-selectors-cheat-sheet/ for a more in-depth cheat sheet.
| selector | description |
|---|---|
p |
a “p” element. Replace with the element you want to capture. |
.myclass |
any element with class=“myclass” |
p .myclass |
“p” element with a class of “myclass”. |
p > .myclass |
every child element of p with a class of ‘myclass’ regardless of the tag. Must be a direct child. |
#myid |
Any element with “id=‘myid’” |
body > div > table .content-table > tbody > tr |
A row within a table classed “content-table” within a div. |
You have to go through the whole path to an element if you need it, which is why you have to look in the inspector section of your browser or use the CSS Selector Gadget (a chrome extension that I’ve never been able to work properly!)
27.4 Going further
The CSS selectors shown in this chapter are a little limiting – you’ll find times when the information you’re seeking isn’t defined using those selectors. That’s when the XPATH selectors we saw in the last chapter are used. It’s beyond the scope of this tutorial, but ask for some help or try to find XPATH examples if you can’t figure out how to get to a part of the page with your css selections – it’s pretty common for this to happen.
We glossed over this before, but any time you use a pipe, whatever comes above a command is used as the first argument of the current command. So this code is the same as
read_html(url). Sometimes you need it as something other than the first argument, in which case you reference it using a period.↩︎A newer version of rvest prefers the use of
html_element()instead of node. For us, they mean the same thing and both work. The newer syntax throws a warning in your RStudio environment that I can’t troubleshoot, so I’m waiting for an update to the rvest package to switch.↩︎str_extract changed in December 2022. Make sure your packages are up to date.↩︎
html_elements ("tbody > tr > .titleColumn > .secondaryInfo") |> html_text(trim=T)↩︎